EZ-FORM MANAGER - “FORM NAME” After you have clicked on a form name in the overview list you will see a page listing all the data that have been submitted using that selected form. The form name will appear in the page heading. ACTION BUTTONS Most of the navigation buttons work in conjunction with the individual forms that have been selected with a check in the left most column of the form list.  Clicking this button will display the data for all the forms checked. All of the data submitted on the form will be displayed, one set after another. Clicking this button will display the data for all the forms checked. All of the data submitted on the form will be displayed, one set after another.
 Clicking this button will print the data for all the forms checked. All of the data submitted on the form will be printed, one set after another, each on a separate page. Clicking this button will print the data for all the forms checked. All of the data submitted on the form will be printed, one set after another, each on a separate page.
 Clicking this button will change the status for all the forms checked to be new, that is, not been viewed. Clicking this button will change the status for all the forms checked to be new, that is, not been viewed.
 Clicking this button will change the status for all the forms checked to be old, that is, having been viewed. Clicking this button will change the status for all the forms checked to be old, that is, having been viewed.
 Clicking this button will resend the email with the data to the addresses originally designated to receive the email. This option is really only useful for forms that were not configured to be secure. Clicking this button will resend the email with the data to the addresses originally designated to receive the email. This option is really only useful for forms that were not configured to be secure.
 Clicking this button will delete the forms selected. Clicking this button will delete the forms selected.
 Clicking this button will return you to the previous web page. Clicking this button will return you to the previous web page.
 Clicking this button will bring up the help text web page associated with this page. Clicking this button will bring up the help text web page associated with this page.
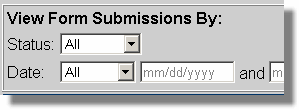
 VIEW FORM SUBMISSIONS BY options. This section will allow you to filter which forms be displayed on the page. VIEW FORM SUBMISSIONS BY options. This section will allow you to filter which forms be displayed on the page.
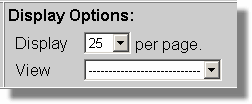
Status: The options are All - show all forms, New - show only forms that have not been reviewed, and Old - show all forms that have been viewed. Date: In the first block specify the type of date filter. In the next two blocks you specify the dates relative to the option selected. Go: Performs the filter based on the two criteria specified. DISPLAY OPTIONS:  Display: Indicate the number of forms to be displayed on a page. If the number of forms exceeds this number a series of page numbers will appear about the list of forms. These numbers are links that will take you to that page. Display: Indicate the number of forms to be displayed on a page. If the number of forms exceeds this number a series of page numbers will appear about the list of forms. These numbers are links that will take you to that page.
View: If you want you can specify which form you want to display. If you specify a specific form you will be taken to the Forms Submitted pages. FORM LIST The underlined column names not only describe the column contents but are also action links to determine how the data in the table will be sorted. Clicking once will change the sort order of the table by the data in that column, lowest to highest. Clicking again will reverse the order. Select column: In this column you select the forms that you will to perform one of the Action Buttons at the top of the page, such as view, print, etc. At the top of the column you can use the “Select All” box to save you the effort of selecting each form individually. Form Name: This indicates the name this form was given in the Form Builder block in EZ-PageBuilder. When you click on the form name in the column, the data submitted with the form will be displayed. This column may also have two other bits of information - If the data in the form has not been viewed, then the word new will be displayed in red.
- If the form was configured to be secure, then a closed lock will be displayed.

Key Value: This is the value of the field that was indicated as the key value in the first block of the form on the page. This field is optional but highly recommended. Consider using a field that will help you identify the information about the form such as the name or account number. Date Submitted: Indicated that date and the time the form was submitted.
FORM DISPLAY The data submitted in the form is displayed in two columns and two sections. The first column is the name of the data submitted. The second column contains the data entered or associated with name in the left column. The top half is the header information. The bottom half is data that was completed on the form. ACTION BUTTONS  Prints the data on the form. Prints the data on the form.
 Closes the window. Closes the window.
|